

Modeling whatever I care to in N scale.
Showing posts with label River Valley Central. Show all posts
Showing posts with label River Valley Central. Show all posts
Sunday, January 21, 2018
Return Loop Modules
I've finished up the return loop modules. These are 4" wide double and quad length modules that complete the return loop on the home layout. They probably won't be sceniced at all, their only purpose is to allow continuous running. If some day backdrops get put up on the rest of the layout you won't see them anyway. I'm thinking there could also be some staging sidings put on them, actually, there probably will be, because as it stands, there is nowhere to park anything.

Tuesday, November 28, 2017
River Valley: Town
I started doing some mockups of the River Valley town module. It's going to be very minimal if I can help it, a couple buildings or a couple houses at most. Just enough to convey that there's a town. I can't decide if they highway should be "Main Street" or if the highway should be perpendicular to it.


The real meat of the town will be the co-op and scrap yard built on a quad module and irregularly shaped S module. Placement of things here is more straightforward, obviously the elevator and fertilizer shed go on the elevator spur, and the scrap yard office somewhere on it's spur.


The real meat of the town will be the co-op and scrap yard built on a quad module and irregularly shaped S module. Placement of things here is more straightforward, obviously the elevator and fertilizer shed go on the elevator spur, and the scrap yard office somewhere on it's spur.

Wednesday, February 15, 2017
Cutting T-Trak Boxes
Here are some dimensions used for a few of the modules. The big quad I have planned and the two singles that are already done are standard widths and depths. Shown in the picture is an inside corner that is also pretty standard as is the double.Also in the drawing is the proposed modification to my end caps, knocking the corners off. I have no idea how you'd scenic those corners so I just eliminated them.
The real variance from typical T-Trak specs are the polygons for the s curve and the s curve with a couple of spur extensions. These ought to be a real challenge to get glued up...
To make the boxes I'm ripping 1/4" sanded plywood into 2 1/4" strips. This will allow a 2" piece of foam to slip in and have 1/4" of clearance for wires and the mounting pads for feet. I screwed up several cuts, but all modules on the proposed arrangement were cut from two 2'x4' panels.

Tuesday, November 1, 2016
River Valley Central: T-Trak Division
Gosh it seems like only yesterday I abandoned my permanent layout plans and embarked on some t-trak to satisfy my railroad bug. My how things have changed in the past year. My family has moved into our 2nd home, which is much more suited to our needs, including a magnificent 10'x10' layout space.
I still really like the t-trak method, and intend to build my home layout one section at a time using t-track sections setup on top of the benchwork with scenes that can be mix and matched. Here's a peek at a first set of modules for a complete layout. There are some nonstandard shapes in here, but they follow the standard length dimensions either single, double, or quad. The two end caps connect to a permanent return loop behind the backdrop. The intention is to add passing sidings back there for staging.

I still really like the t-trak method, and intend to build my home layout one section at a time using t-track sections setup on top of the benchwork with scenes that can be mix and matched. Here's a peek at a first set of modules for a complete layout. There are some nonstandard shapes in here, but they follow the standard length dimensions either single, double, or quad. The two end caps connect to a permanent return loop behind the backdrop. The intention is to add passing sidings back there for staging.

Thursday, November 12, 2015
The Ndecisive Modeler
The need for more space in the house is upon us, and has required I rethink my layout plans. I no longer have space for a permanent layout and the River Valley Central has been abandon, the right of way turned back to the planning commission. I peeled up all the track, fortunately I had not ballasted much yet so most of it was salvageable. The pink foam was reclaimed, and the bench work sawed into fire pit size chunks.
I'm staying with N scale however. Throughout my layout planning I gradually moved from switching operations which turns out I am not at all interested in to a railfan type plan that is much more suited to my interests. I've also discovered that i really like building models, maybe more so than actually railroading. I like building structures, painting and weathering freight cars and locomotives. I do need some kind of layout though for the occasional therapy session and photography. The stark white work bench top is a great work surface but a terrible photo backdrop.
Armed with these "givens and druthers" and having seen some neat T-Trak modules from a couple of different clubs, it seems T-Trak might be a good way to feed my inner layout monster for a while. They're easily broken apart and stored, Kato Unitrack is bullet proof, each module can be it's own scene for photographing models or connected together for some railfanning, and each section can be completed independent of other sections helping relieve the "Oh god there's sooo much to do" procrastination.
All that said, I bring to you now the Ndecisive Modeler so you can follow along as I waffle between projects and ideas.
Monday, January 19, 2015
Reality Bites
The plan all along has been to work this little layout for two eras or more. Late 1970's and late 1980's for sure, with maybe a late 90's thrown in now and then. The area I'm modeling stayed roughly the same during this time. The only distinctive change was 1986 when C&NW sold it's Winona, MN to Rapid City, SD line to a group of investors who started DM&E. At that time DM&E didn't have any rolling stock of their own and relied on a lease agreement with C&NW. DM&E did get several locomotives from C&NW, and bought several more from SOO. To pull off my dual era all I need is a change in locomotives. For the C&NW roster an array of beat up Alcos will make it clear we're looking at the end of an era, and for DM&E a couple of raggedy SD9s and 10s should be enough indicate the beginning of another. The DM&E will also roster an SD40-2 in new blue and yellow paint.
The C&NW roster shouldn't have any problem negotiating the tight curves planned. The problem comes when I skip ahead 10 years and try to run the DM&E Severe Duty power. The SD9 and 10 might negotiate the 9 3/4" curve and tight #4s in the staging yard, but I'm fairly certain the SD40-2 isn't going to like that and now is the time to do something about it. At best it will probably pull the car behind it off, and at worst the whole train will flop off the rails and onto the floor. This saddens me a bit, because I had intended to lay all the track using stuff I already have, some of it from my first trainset. Something's got to give though, and unfortunately this track is out.
Pulling the plug on trying to build this without buying any track means there is a great deal more flexibility in how the plan can come together. The new plan features 12 1/2" and 13 3/4 for the two big turns and 15" for the S to the elevator tracks. Not large by any means, but way bigger than 9 3/4 and big enough the SD40-2 should be able to make it through with cars in tow.

Those large curves eat up a lot of space, no longer a 30"x80" it has been stretched out to 36"x96". It is amazing how much more railroad can fit with just a few more sq.ft. The return of the switchback is unfortunate, but not a show stopper. I anticipate the elevator switch engine will be parked somewhere along the spur to the right. The road power will deliver cars to the elevator in 3-4 car cuts and it will be up to the elevator crew to get them all spotted under the loader. That operating change should make the switchback be less cumbersome. The road power won't ever be zig zagging through it, and the elevator switcher won't ever leave it. The angle of the switchback spur is open to debate, it doesn't look right as is. Staging capacity has been increased by a car length or so, and new to the plan is a locomotive staging yard. I think my favorite change is the flowing mainline vs the Bowman Gray stadium.
I still have all the new track I bought for my attempt at a shelf switching layout, but quite a bit more will be needed. Thankfully the Atlas Track Famine has passed and I should have no problem locating the rest of it. Cost will be an issue however, as I've gone from having near zero cost for track to several hundred dollars of track. Because if this I've decided to break it down into more affordable chunks. The main loop will be laid, followed by the industry spurs and interchange, and finally the staging yards. The main loop is key, because getting it to a point where trains can run, even if just a loop, is a huge motivator.
Friday, November 29, 2013
Benchwork Planning
After a long hiatus over the summer, I'm getting back to the railroad again. Over the summer I've done alot of thinking about it, just no working on it. I've also been to a few swap meets and such and have done some more research on specific types of freight cars I'm interested in.
First things first I guess, the track needs somewhere to go. The original plan was to use a door, but after looking at all the doors in the house and their rectangular shape, the oval design of the layout creates some odd corners. I thought about putting a farmhouse in one and some trees in another, but those sharp corners still just don't sit right in my mind. The door idea has given way to a traditional open framework design.

The structure will be composed of 1/2" plywood ripped into 3" strips. Portability and light weight will take a hit, but semi-mobility was still be considered. I doubt I'll be dragging it to any events but I'd like to be able to get it out of the house if we move. The legs will be 2"x2" sticks, detachable, mounted to the 4 obvious corners of the inner structure, and braced with more plywood "boards". The whole thing will be topped with pink foam, and wrapped with 1/8" Masonite for a nice clean look. I'm shooting for around a 48"-50" grade height all said and done.

The track plan overlay is roughly scaled to fit, this is the look I was shooting for with the round corners. You can see clearly why the left front corner is still squared off. The route of the spur there may be modified some day to connect to an add on section, or it might just remain straight. We'll cross that road at a later time. I realize the track near the back of the layout is very close to the edge, I do plan to extend the Masonite up 2" or so to contain things around the back side. You may notice the plan has changed... Again. I've been studying the minimalist works of some others and decided to ax much of the track. I also discovered some #6 turnouts in the track box, so the lower left spur and the cross over have been "upgraded".
Thursday, March 21, 2013
Revisions Are Unavoidable
I just can't stick to a plan I guess. I ran trains around this quite a bit, and as I mentioned earlier, I just don't like the switchback. I want to be able to switch cars in and out of the spur on the right, but can't because the spur on the left is always blocking moves to the right when there are cars on both tracks. Now don't get me wrong here, this is being built to be a roundy rounder. Mostly I just want to watch, but I might want to swap cars out every 3rd pass or something, and I wan't to be able to do it without fiddling around with a switchback.
So here it is. The River Valley Central v.2. Using no more track, and re arranging the two industry spurs, the switchback is gone. The industry on the right is now serviced directly from the siding, and the industry at the left can have cars spotted on either track without interfering with things on the right. Things are a bit cramped on the left, but the river can be pushed wherever it needs to go.
The "interchange" was also shortened and moved to the right a bit, it now holds about as many cars as fit on the "staging" siding in the back and the passing siding on the front. Additionally, there's a sweet spot for a depot to sit just to the left of it. I'm not sure if the "interchange" will be used for interchange, or as a starting point for another railroads trackage rights with the end point represented in the staging area. I guess it doesn't matter what it is, which ever way the wind blows is the way it will get used.
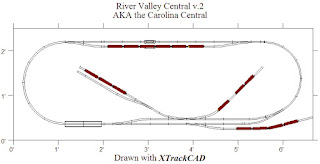

Sunday, February 10, 2013
Foam and Track Fittment
Over the past week or two I've made fair progress, starting with gluing all the scraps of insulation I had left back together to make a 80"x30" rectangle. The original plan was for a 28" door, but all my pieces added up to 30". I figure this provides a little flexibility when I go shopping for a door. Exactly what you want isn't always what you get when you shop the ReStore and the bargain pile at Menards. Of course one afternoon I was in the store getting some things for work and found a near perfect 30" door for $10 with only minor dings, but since I was on work time I passed it up. By the time I got back up there later it was of course gone!
I also cut and fit nearly all the track. The end curves are all 11" and 9" sectional track, as are the 19" curves for the sidings. A majority of the straight sections are scraps of flex track of various lengths, but there are a few pieces of sectional here and there, including the rerailer sections in the back. I have not decided what to use for road bed, but I am seriously considering cutting my own from foam weather strip tape. We'll see how that goes I guess. I do also need to pickup a couple of bridges. I won a Blair Line gift certificate as a door prize at the NMRA Kate Shelley Division swap meet last fall, so I'll be ordering the same trestle kit used by Marty McGuirk on his original. Also need to pick up a couple deck girder bridges yet.

I also cut and fit nearly all the track. The end curves are all 11" and 9" sectional track, as are the 19" curves for the sidings. A majority of the straight sections are scraps of flex track of various lengths, but there are a few pieces of sectional here and there, including the rerailer sections in the back. I have not decided what to use for road bed, but I am seriously considering cutting my own from foam weather strip tape. We'll see how that goes I guess. I do also need to pickup a couple of bridges. I won a Blair Line gift certificate as a door prize at the NMRA Kate Shelley Division swap meet last fall, so I'll be ordering the same trestle kit used by Marty McGuirk on his original. Also need to pick up a couple deck girder bridges yet.

Thursday, January 17, 2013
Drawing A Plan
I reviewed reposts of the original Carolina Central plan as well as peeked at the Getting Started book on Google Books. It all provided exactly the information needed to draw one up using XtrackCad. I had a little trouble making the switch on the right fit, not sure how it fits on the real thing but I had to move it around the curve just a bit to get things to line up (or at least be fudgeably close). I even took the time to learn how to run trains with XtrackCad. Pretty crude, but cool none the less.


The complete parts list for this version, the .xtc file is available as well:
Count | Description
----+------------------------------------
34 | Atlas 2501 5in Straight
7 | Atlas 2510 9 3/4R full section
9 | Atlas 2520 11R full section
2 | Atlas 2521 11R half section
4 | Atlas 2526 19R section
2 | Atlas 2532 Rerailer Track
2 | Atlas 2546 Warren Truss Bridge
4 | Atlas 2750 Custom Std #4 LH Switch
4 | Atlas 2751 Custom Std #4 RH Switch
2 | Atlas XXX 1 1/4in Straight
3 | Atlas XXX 2 1/2in Straight
4 | Atlas XXX 5/8in Straight
0 | 11.394 N Flex Track
----+------------------------------------
Much to my delight I've got everything but the Warren Truss Bridges (I don't really care for them and might sub them for some plate girder bridges instead). All the curves and switches required are in the box and I think there's enough scraps of flex track to do the straights. The switches are hideous, they have a giant manual switch machine attached but I have an idea in my head about chopping that thing off and adding a spring like this:

There are also enough scraps of pink foam in the garage to be able to stick a 28"x80" piece together. Now on the lookout for discount door...
Thursday, December 27, 2012
So what's next?
One of the first track plans I bumped into when I decided to start railroading again was Marty McGuirk's Carolina Central featured in the December '96 and January '97 Model Railroader as well as covered in his book N Scale Model Railroading: Getting Started in the Hobby. There is a second edition of the book available now that covered the Androscoggin Central, a similar but larger plan.
The Carolina Central has a bit of a cult following around the Internet, searching for Carolina Central N Scale returns tons of information. There are a number of forum threads including a very lengthy one, and even a series of YouTube videos on someone's version of it. It's been rehashed in recent years with a Kato Uni-Track version.
As appealing as Uni-Track is, that version of the plan is a bit condensed for my taste, and being I already have a boat load of non-Kato track I can't really justify spending a bunch of money on more. In addition to wanting a roundy rounder to run trains on, I'm also trying to keep the cost manageable. Health, family things, other interests, and (sorry) the unstable economy all factor in.
I really like the original plan, it offers continuous running, a clever place to hide a train, no hoaky tunnels, grades, or mountains. It has opportunity for good scenery, photo ops, and as much switching as I care to do. I don't care for the switchback, but can work with it, and it does maybe offer a good reason to have a small switch engine assigned to the town. It's also got places for a bunch of DPM buildings I have built over the past couple years, as well as a good place for the obligatory scrap yard (can't have a railroad without some scrap metal can you?).
I really like the original plan, it offers continuous running, a clever place to hide a train, no hoaky tunnels, grades, or mountains. It has opportunity for good scenery, photo ops, and as much switching as I care to do. I don't care for the switchback, but can work with it, and it does maybe offer a good reason to have a small switch engine assigned to the town. It's also got places for a bunch of DPM buildings I have built over the past couple years, as well as a good place for the obligatory scrap yard (can't have a railroad without some scrap metal can you?).
Over the next few weeks I'll have to dig out the box of track and see what parts are in there, I'm thinking there are enough usable pieces that I won't have to buy much if any. Sorry no pictures this time, just the blob of text.
Tuesday, December 11, 2012
What's This All About?
A few years ago I dug my N scale trains out of the closet after having been in storage for, oh, about 20 years. My skills haven't improved much at all and that box full of stuff hasn't improved much either. Thankfully the quality and quantity of N scale things has improved greatly in that time.
Right away I joined a bunch of message boards and forums and made alot of friends(and a couple enemies I'm sure). It was great for a while but a guy can only read so many forum posts on which coupler mounting is correct, which brand of track is correct, how terrible some new product is, and how this diagram showing a maze of track is sure to operate "prototypically" because it includes a Timesaver that is going to be all kinds of fun. It all runs together after a while and every couple months it repeats like a broken record with all the usual suspects injecting all the usual comments.
To get me going a big box of track was donated by my uncle. A lot of really old Atlas track, some old Atlas switches, some really really old Lima and Model Power flex. He's an HO'er and didn't really have any use for this stuff. It supplemented my own collection of really old Bachmann track well. I cut it all up, tried a hundred different arrangements on all kinds of different benchwork types and took a lot of (bad) advice from other people. In the end I trashed it all, spent a bunch of money on Atlas code 55 track and threw together a switching shelf based on Bryon Henderson's San Jose Switching Layout. I investigated body mounted couplers, scale profile metal wheels, and fiddly etched detail parts. I would surely be able to wow everyone with my intricate switching maneuvers and super detailed trackwork. Heck, I was nearly convinced to rip up the Atlas track and start hand laying, joint bars and all!

I dreamed up a really sweet waybill operating scheme where I roll a dice, draw waybills from a deck, assemble the train, and head out for some serious switching operation. Oh what fun. Don't get me wrong, it's a cool plan. It operates well, and some day it will look real good. Trouble is it's not at all what I want. It deviates from my original goal to run trains. I'm a roundy rounder at heart and this thing just doesn't do that. I do want to finish it some day, or plug it in to a larger system (something that goes around and around), but for now it's been put on hold as I get back to basics and build what I want.
Right away I joined a bunch of message boards and forums and made alot of friends(and a couple enemies I'm sure). It was great for a while but a guy can only read so many forum posts on which coupler mounting is correct, which brand of track is correct, how terrible some new product is, and how this diagram showing a maze of track is sure to operate "prototypically" because it includes a Timesaver that is going to be all kinds of fun. It all runs together after a while and every couple months it repeats like a broken record with all the usual suspects injecting all the usual comments.
To get me going a big box of track was donated by my uncle. A lot of really old Atlas track, some old Atlas switches, some really really old Lima and Model Power flex. He's an HO'er and didn't really have any use for this stuff. It supplemented my own collection of really old Bachmann track well. I cut it all up, tried a hundred different arrangements on all kinds of different benchwork types and took a lot of (bad) advice from other people. In the end I trashed it all, spent a bunch of money on Atlas code 55 track and threw together a switching shelf based on Bryon Henderson's San Jose Switching Layout. I investigated body mounted couplers, scale profile metal wheels, and fiddly etched detail parts. I would surely be able to wow everyone with my intricate switching maneuvers and super detailed trackwork. Heck, I was nearly convinced to rip up the Atlas track and start hand laying, joint bars and all!

Subscribe to:
Posts (Atom)